
How to make runes? We will tell! First, select which material you use more - wood or stone. And keep in mind that the runes that you plan to use for personal purposes is better to do with your own hands. Filled with your energy they will have the most positive effect.
How to make runes with your own trees
The tree is a very "warm" material that keeps the energy-enclosed in it and increases it. It is best to choose that breed of wood, the properties of which you are especially close and necessary.
Properties and values of different breeds of wood
Find out what awaits you today - a horoscope for today for all zodiac signsBy numerous subscribers requests, we have prepared an accurate horoscope application for a mobile phone. Forecasts will come for your zodiac sign every morning - it is impossible to miss!
Download free: Horoscope for every day 2020 (Available on Android)
Different species of trees have different values. This is important to consider when choosing a suitable wood for the manufacture of runes.
For example:
- Ash - Wood protection. This is a wonderful material for the manufacture of rune faucenes, the action of which will be directed to protect a person from any negative coming from the outside
- The apple tree has the strongest ability to attract love to a person, to make it attractive for the opposite sex. Therefore, Apple's amulets are most suitable for the manufacture of amulets that will help solve all the problems associated with personal relationships.
- Oak has powerful healing properties. Made from this tree of wood amulets help strengthen and restore health
- Choose wood available to you. Water fits well - it is easy to find branches in the near forest or grove.
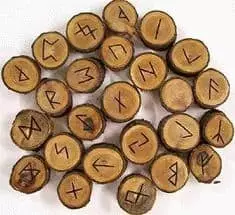
It is best for the manufacture of wooden runes to use trees branches. They are easiest to cut into the circles, of which you will make runes.
How to make runes from wood: algorithm
Algorithm manufacturer of runes at home is as follows:
- Collect the branch of thirteen circles. Approximate thickness of each - 3-4 centimeters. It is not necessary to remove the bore, but you can do it if desired. Tip: If you do not want to mess around with a cut, get ready-made wooden blanks in a store with esoteric goods or in a stall with construction materials
- Take a piece of rigid sandpaper and process the workpiece to align their surface. At the end, cover the circles with a transparent varnish and wait until it dry
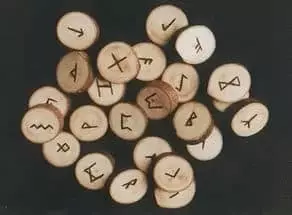
- Using a pencil, apply images of runes to each circle. Then, with the help of a knife, do shorts according to the contours of the contours. First, do the main lines, the largest, and at the end are small. Vertical cuts are made in the direction from top to bottom, and the diagonals are drawn from left to right
- After that, you can paint the runes in the desired color. Wait for the paint complete drying, and again cover the runes with a transparent varnish
Ready! You can start using ready-made runes.
IMPORTANT: Explore the value and description of each symbol. Each rune has its own color in which it will need to be painted. Strictly ensure that the figure of the rune corresponds to its correct screening. One incorrect incision - and the rune will become unsuitable for use, turning into a useless piece of wood.
How to make runes at home from stone
To find suitable for the manufacture of runes stones, go to the shore of the reservoir - rivers, lakes or the sea. It is necessary to find small pebbles round shape with a smooth, polished surface. They must be flat.If you remember how in childhood they let the "pancakes" on the water, then immediately understand what stones are suitable.
After you have found thirteen stones of suitable size and shape, rinse them under running water and remove to dry. It is best to dry in the sun - then future runes are charged by positive solar energy.
Inventory for the manufacture of stone runes
For the manufacture of runes from the stone you will need the following inventory:
- Little tassel with a rigid bristle, which will be convenient to apply a drawing of a rune onto a stone
- Transparent varnish for fixing an image
- Enamel or any other quick-drying persistent paint. It is desirable that she was waterproof
- Pen, toothpick, a small wand with a pointed end - a tool that will be comfortable to apply paint to the surface of the stone
- Rag or napkin, which you will remove surplus paint
After you prepare everything you need, you can proceed to the manufacture of runes. Watch the video on how to make runes at home:
Algorithm manufacturer of runes from stone at home
So, start doing the runes in such a sequence:- Take the harvested stones and gently cover them with a transparent varnish with a brush. Wait until the lacquer dry and make sure that there are no non-rectified areas
- Apply the image of each rune to stones with a stick and paint. Choose paint color that suits the value of rune characters. Lines must be clear, straight, have the same thickness. Do not overdo it - it is better to use smaller paint so that it does not spread, and I didn't have to redo everything
Tip: Before drawing, you can schematically apply the image of the runes onto a stone with a simple pencil. Also practice on paper draw runes so that it does not arise difficulties when you portray them on a solid surface
Finally, cover the stones with a transparent varnish again to save the image for a long time.
How to store runes?
The runes are important not only to make, but also to store correctly. To do this, a bag, stitched from dense natural fabric, is precisely in such bags wearing ancient shamans with them. Perfect material - flax. Also suitable a bag of genuine leather.
It should be tied up with a lace. If there is a desire to make decorative notes, you can make embroidery with colored threads or beads on the bag.
Store the runes in this bag always - they should be not available for prying eyes. To see them is allowed only to the owner.